'Play with your Pieces, not with your Pawns!'
Your Chess Guide's first (and only) chess teacher used to repeat this saying frequently.
It often pops into mind when making the final choice between two equally attractive moves : one a piece move and the other a Pawn move.
In this article we'll look at some elements of piece play and chess strategy which are in the arsenal of every good player.
These elements assume you already know about Positional Play and about Pawn Structure (if not, see the link box at the end of this article).
Our guide here is Aron Nimzovitch, the author of two ground breaking books on chess strategy published in the 1930s:-
Nimzovitch covered far more ground in far more depth than we can possibly cover in this article, but we are confident that most good players would rank the following concepts among the most fundamental.
The numbers under each diagram refer to the numbering of the diagrams in My System.
|
Rook on the 7th rank
|
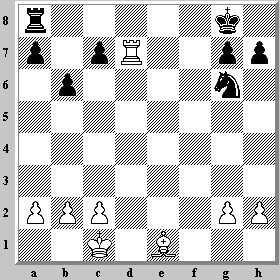
My System 029; Black to move
|
|
The term 7th rank might be confusing unless you realize that it can be counted from the side of each player. The 7th rank of one player is the 2nd rank of the other player, where the Pawns are placed at the start of the game.
Nimzovitch devoted an entire chapter to the subject of Rook on the 7th rank (and 8th rank, also called the back rank).
All players learn quickly that a Rook on the 8th rank can checkmate an enemy King which has failed to create a flight square ('back rank mate').
The diagram shows a typical position with a 'Rook on the 7th'.
The White Rook on d7 is well posted. It
- attacks the Black Pawns on the Queenside and on the Kingside,
- prevents the Black King from reaching the center by the shortest route, and
- threatens to get behind the Black Pawns if they advance.
White wins a Pawn after 1...Rc8 2.Bg3, but has even bigger material gains after 2.Bc3.
|
|
Two Rooks on the 7th rank
|
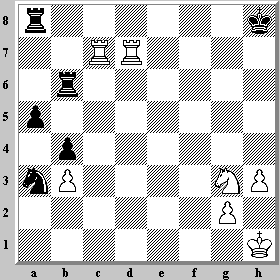
My System 030; Black to move
|
|
If one Rook on the 7th rank is a powerful weapon, then two Rooks on the 7th are often sufficient to win by force. In the diagram, Black is helpless against the Rooks supported by the Knight : 1...Rh6 2.Nf5 Rh5 3.g4 Rxh3+ 4.Kg2 Rxb3 5.Rh7+ Kg8 6.Rcg7+ Kf8 7.Rh8 mate
Two Rooks on the 7th often compensate for a significant material disadvantage by delivering perpetual check to a King trapped on the back rank.
|
|
Rook in the endgame
|
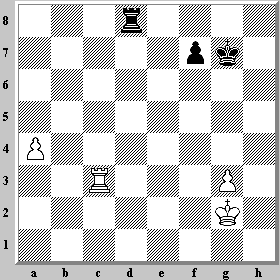
My System 078
|
|
While we're discussing the power of the Rook, it's worth remembering the endgame principle that Rooks belong behind passed Pawns. As the Pawn advances, the Rook's space increases.
In the diagram, White to move should play 1.Ra3, getting behind the a-Pawn. Black to move should play 1...Rd2+ 2.Kf3 Ra2 for the same reason.
|
|
Bishop pair (1)
|
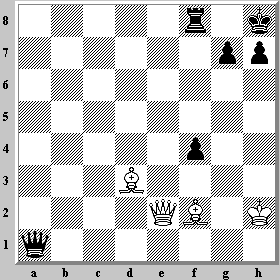
My System 179; White to move
|
|
Nimzovitch devoted another chapter to The Two Bishops, also known as the Bishop pair.
Although Black has a material advantage in the diagram, White wins immediately with 1.Qe4 g6 2.Bd4+.
This shows the tactical power of the Bishop pair. The next diagram shows their positional power.
|
|
Bishop pair (2)
|
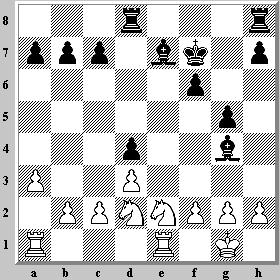
My System 181; Black to move
|
|
To put up a fight, White must activate the pieces. The combined action of the Black Bishops and Pawns prevent White from establishing a Knight in the center, where it is most effective.
The diagram is Richter - Tarrasch, Nuremberg 1888. The game continued 19...c5 20.Ng3 h5 21.f3 Bd7 22.Re2 b5 23.Rae1 Bf8 24.Nge4 Rg8 25.Nb3 Rc8 26.Ned2 Bd6 27.Ne4 Bf8 28.Ned2 f5 29.Re5 Bd6 30.R5e2 Ra8 31.Na5 Rab8 32.Nab3 h4 33.Kh1 Rg6 34.Kg1 Be6 35.Rf2 Ra8 36.Rfe2 a5 37.Nb1 a4 38.N3d2 c4 39.Nf1 Rc8 40.Kh1 c3 41.bxc3 dxc3 42.Ne3 b4 0-1
|
|
The outpost
|
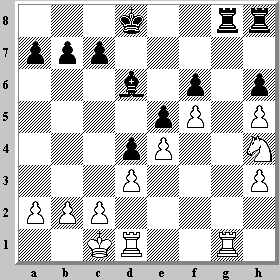
My System 027; White to move
|
|
Nimzovitch gives both 1.Rg2? Rxg2 2.Nxg2 Rg8 and 1.Rg4? Rxg4 2.hxg4 Rg8 3.Ng6 as unsatisfactory for White.
Only 1.Rg6! (the 'outpost') Rxg6 (else 2.Rdg1 is strong) 2.hxg6 wins, where White suddenly has a protected passed Pawn only two steps from promotion.
Our dictionary defines an outpost as 'an outlying or frontier settlement'. An outpost is often associated with an open file. The following diagram shows another method of using an open file to achieve a winning position.
|
|
Doubling on the open file
|
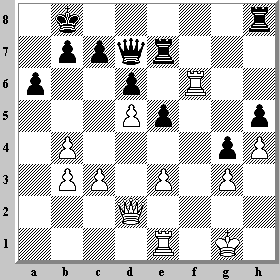
My System 082; White to move
|
|
After White plays 27.Ref1, Black has no way to oppose the Rooks on the f-file. These are called doubled Rooks. If the Queen were also on the f-file, we would say that White has tripled on that file.
Capablanca - Martinez, Argentina 1914, continued 27.Ref1 Rhe8 28.e4 Qb5 29.Ra1 Qd7 30.c4 Rf7 31.Rxf7 Qxf7 32.Rf1
Qg7 33.Rf5 Rf8 34.Qg5 Qh8 35.Qxh5 Qxh5 36.Rxh5 Rf3 37.Kg2 Rxb3 38.Rf5
Rb2+ 39.Rf2 1-0
|
|
Blockade (1)
|
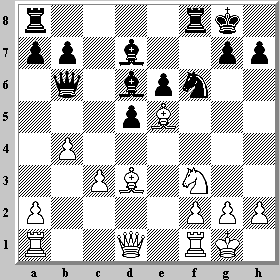
My System 116; White to move
|
|
Nimzovitch is perhaps best known for his ideas on the blockade, where a piece prevents a Pawn from advancing by occupying the square in front. In the diagram Black has a Pawn chain on d5 and e6. If Black could play e6-e5, the central Pawns supported by the pieces would give Black an advantage. White plays to prevent this.
After 15.Qe2 (strengthening the blockade on e5) Rac8 (if 15...Bxe5 16.Nxe5 Rac8 17.c4) 16.Bd4 Qc7 17.Ne5, the Bishop on d4 and the Knight on e5 are well centralized and impossible to dislodge. White has a big advantage.
|
|
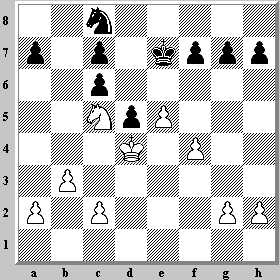
Blockade (2)
|
My System 166
|
|
This diagram shows a typical weakness of doubled Pawns.
Black's Queenside majority can not advance and the White Kingside Pawn majority should be sufficient to win.
|
|
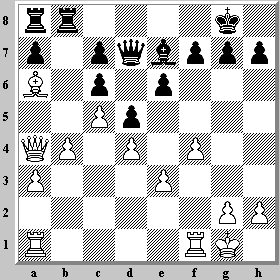
Cramped terrain
|
My System 165; Black to move
|
|
This diagram shows an extreme form of blockade. Black's position is so restricted that neither Rook can move. White is free to organize an advance on the Kingside.
***
The remaining diagrams illustrate positional themes which arise frequently.
|
|
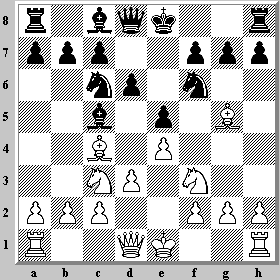
Putting the 'question' to the Bishop
|
My System 095; Black to move
|
|
After the opening moves 1.e4 e5 2.Nf3 Nc6 3.Bc4 Bc5 4.Nc3 Nf6 5.d3 d6 6.Bg5, Nimzovitch says that along with the moves 6...Bg4, 6...Nd4, 6...Na5, and 6...O-O, Black can force White to declare the Bishop's intentions with 6...h6. White can exchange Bishop for Knight or retreat along either diagonal.
If 7.Bh4, then 7...g5 8.Bg3 breaks the pin at the expense of weakening the Kingside. This maneuver is most effective when Black has not castled Kingside.
|
|
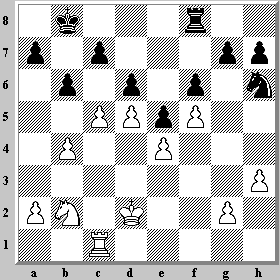
Attacking the Pawn-chain at its base
|
My System 119; White to move
|
|
Nimzovitch believed that the weakest point of a Pawn chain is its base, where the Pawn is not protected by another Pawn.
In this diagram, White fixes the base at d6 and then attacks it with the remaining pieces.
1.cxd6 cxd6 2.Rc6 Nf7 3.Nc4 Rd8 (If 3...Rc8 then 4.b5 Rxc6 5.dxc6 with a better endgame.) 4.a4.
Now White is free to advance the Kingside Pawns supported by the King.
|
|
Defending a flank attack
|
My System 123; White to move
|
|
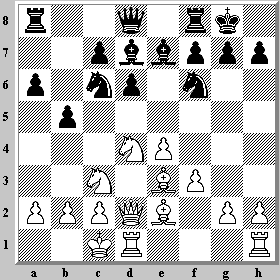
The diagrammed position (Nimzowitsch - Amateur, Riga 1910) occurred after the opening moves 1.e4 e5 2.Nf3 Nc6 3.d4 exd4 4.Nxd4 d6 5.Nc3 Nf6 6.Be2 Be7 7.Be3 Bd7 8.Qd2 a6 9.f3 O-O 10.O-O-O b5.
Black was undoubtedly expecting 11.g4, with a race to push the Pawns on opposite sides of the board.
White instead followed the principle of defending a flank attack by active play in the center : 11.Nd5 Nxd5 12.exd5 Nxd4 13.Bxd4 Bf6 14.f4 Re8 15.Bf3. White's better center gives more freedom of play.
|
|
Provoking a weakness
|
My System (between 169 and 170); Black to move
|
|
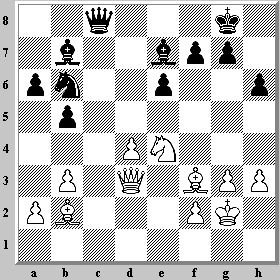
The diagram is from Rubinstein - Lasker, Moscow 1925, after the opening moves 1.d4 d5 2.c4 c6 3.e3 Nf6 4.Nc3 e6 5.Nf3 Nbd7 6.Bd3 dxc4 7.Bxc4 b5 8.Be2
a6 9.O-O Bb7 10.b3 Be7 11.Bb2 O-O 12.Ne5 c5 13.Bf3 Qc7 14.Nxd7 Nxd7 15.
Ne4 Rad8 16.Rc1 Qb8 17.Qe2 cxd4 18.exd4 Rc8 19.g3 Qa8 20.Kg2 Rfd8 21.Rxc8
Rxc8 22.Rc1 Rxc1 23.Bxc1 h6 24.Bb2 Nb6 25.h3 Qc8 26. Qd3
26...Nd5 threatened ...Nb4. White prevented this with 27.a3, weakening the Pawn on b3.
The Knight immediately vacated the d5 square for the Bishop with 27...Nb6 28.Kh2 Bd5 and Black pursued the attack on the weakened Queenside with 29.Kg2 Qc6 30.Nd2 a5.
The game continued 31.Qc3 Bxf3+ 32.Nxf3 Qxc3 33.Bxc3 a4 34. bxa4 bxa4 35.Bb4 Bxb4 36.axb4 a3 37.Nd2 Nd5.
Black won after another 20 moves.
|

